How To Build A Water Cooled PC
If you are new to liquid cooling, or if you've never purchased Koolance products in particular, you may be wondering what is required to get started. A typical water cooling system consists of four main parts (see also: Liquid Cooling 101):
- A Radiator (heat exchanger) with fans to move heat from liquid into air
- Water Blocks to transfer heat into liquid
- A Pump to move the liquid
- A Reservoir for automatically filtering air from the liquid and storing excess coolant
There are many practical water cooling configurations depending on your application and preferences. You should begin your decision based on which components will be water cooled. Regardless of whether you're cooling a computer or something else, the expected heat output and desired temperature range of these areas will dictate many of your liquid cooling parts.
Determining Approximate Heat Output
Hardware is designed with a TDP, or "Thermal Design Power" in mind. This is the maximum amount of heat a cooling system is expected to handle for that component at normal clock speed and voltage. Here is a rough guide:
- CPU Processor: 60-150W
-
Video Card
- Single GPU (low-end): 100W
- Single GPU (mid-range): 150-250W
- Single GPU (high-end): 200-350W
- Dual GPU (high-end): 300-450W
-
Motherboard
- Chipset: 10-30W
- Voltage Regulators: 5-20W
- Memory: 2-5W per stick
- Hard Drive (regular or SSD): 10-30W
The two primary targets for water cooling in a PC computer are the CPU and video graphics card. These areas produce the highest amount of heat and benefit most from liquid cooling. We can consider these "high heat" sources (a dual-GPU video card should be considered as two high heat sources). The remaining areas on the motherboard, RAM, and hard drives are considered "low heat" sources. Low heat components can be considered in aggregate, but they don't usually contribute enough heat to significantly affect radiator selection.
Choosing a Radiator
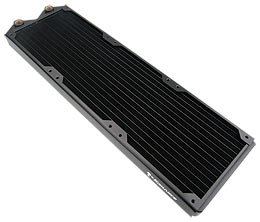
Heat exchanger size and airflow are critical to a PC water cooling system's performance-- moreso than liquid flow rate. For this reason, it's recommended to use the largest radiator you can comfortably fit into your workspace, computer chassis, etc. Larger radiators are advantageous because they decrease liquid temperature and can allow for quieter fan speeds.
What is the minimum radiator size needed if you have space constraints? Our suggested minimum sizes are based on the number of "high heat" devices (CPU or GPU) you will liquid cool:
- 1 device = 1 fan radiator
- 2 devices = 2 fan radiator
- 3 devices = 3 fan radiator
- 4 devices = 4 fan radiator
- 5+ devices = larger than 4 fans, or use multiple radiators
These are only recommendations. The "correct" option is based on your desired temperature and noise range. Some customers find it acceptable to cool 4 video cards with a 3-fan radiator by accepting a somewhat higher temperature range, and/or by running the fans faster. Downsizing too much is something to avoid, though, since it's entirely possible to choose a radiator which is too small to handle a heat load.
Koolance lists "FPI" (fins per inch) for its heat exchangers, which is the fin density. This can be relevant for users deciding to do one of the following:
- Emphasize cooling performance and opt for the largest, highest fin density radiator allowable. Pair it with high CFM/pressure fans. Generally, 120mm fans push more air than 140mm fans.
- Emphasize lower noise levels by selecting a lower fin density radiator. Use medium-range fans and/or voltage-throttle them. Generally, 140mm fans are quieter than 120mm fans.
Low fin density radiators will still improve with more airflow, and high fin density radiators can be quieted by reducing fan speed, so there is a lot of room for tweaking. Either decision should result in significantly lower chip temperatures than air cooling (see recommended radiator sizes above).
Selecting Water Blocks
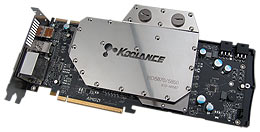
Koolance has a range of individual water blocks broken down by category. For PC cooling, a convenient Product Selection Tool is also offered. After supplying some basic hardware criteria, this page will generate a list of potential water blocks to use in your future cooling system. Also see our water block help pages under "Information->Product Help" above. If you require assistance, please let us know.
Finding a Pump
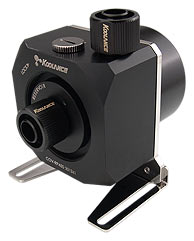
Koolance offers several pumps of various specifications. The more cooling components added to a cooling loop, the stronger the pump needed to counter flow restriction. For a typical computer cooling loop with a 3-fan radiator and a few water blocks, any pump offered by Koolance should provide enough flow.
Flow rate tends to be over-emphasized in PC cooling. For the majority of loops, effective flow rates higher than 1.5-2.0 LPM (0.4-0.5 GPM) won't contribute much, if anything, to thermal performance. A reliable pump is important, as is making sure it's strong enough to keep adequate flow through your selected components. But for users looking to improve thermal performance, increasing radiator size and airflow is almost always more effective.
Keep in mind that the maximum flow rate listed for pumps is at zero static head pressure, while the maximum static head is at zero flow rate. That means the actual flow rate in a cooling system will usually be quite a bit lower than the pump's maximum specification.
The Reservoir
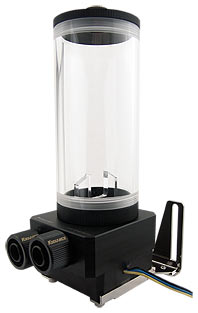
The primary purpose of a reservoir is to bleed air from the loop and to store extra liquid to reduce maintenance. It won't assist with cooling aside from delaying the time required to reach maximum heat saturation. Reservoirs are also a good opportunity to show off your water cooling system. The size and type of reservoir is based solely on aesthetics and available space. A large, LED-lit reservoir with UV colored coolant mounted against a side window or front drive bay will be highly visible.
Hose Size and Fittings (6mm, 10mm, or 13mm?)
Tubing is based on allowable space and personal preference. 6mm (1/4in) internal diameter hose is a good option for compact areas like servers and media centers. For computers with more space, 10mm (3/8in) or 13mm (1/2in) ID is recommended. There are few situations where 13mm (1/2in) ID hose outperforms 10mm (3/8in) in temperature, so we encourage this choice based primarily on whichever looks best to you.
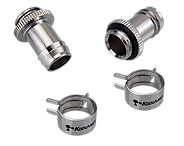
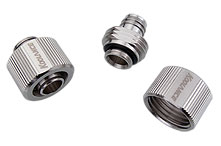
Your fittings will follow the hose size you choose. Be sure that both the ID (internal diameter) and OD (outer diameter) of your fittings match your selected hose size. Hose barbs, unlike compression fittings, will accept different outer diameters by changing the clamp (the ID must still match). Barbs require pliers to install the clamp, while compression fittings are secured by hand.
Barb Fittings
Compression Fittings
Stay Connected